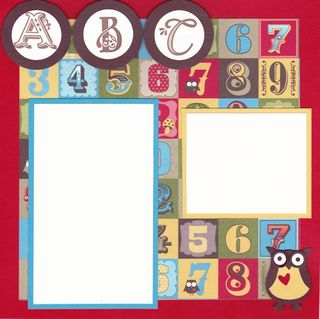
In honor of National Scrapbooking Month I am featuring this Guest Blogger post. My sister and fellow Stampin' Up! demonstrator came up with adorable scrapbook page to share with us! It's perfect for a teacher gift or for your child's school album. It uses the adorable Play Date Designer Series Paper! Thanks, Elaina! Visit her blog here: http://elainascardsandcrafts.blogspot.com/

Supplies Used:
Stamp Set: Broadsheet Alphabet (W118724, C120585)
Card Stock/Paper: Play Date Designer Series Paper (117168) 7”x7”; Real Red Card Stock (102482) 8”x8” and scraps for punching; Tempting Turquoise CS (102067) 5-1/2”x3-1/2”; So Saffron CS (105118) 3-1/4”x2-3/4” and scraps for punching; Whisper White (100730) 3”x5”, 3”x2-1/2” and scraps for stamping; Chocolate Chip CS (102128) scraps for punching. [Note: Card Stock item numbers refer to the 8-1/2×11 packs.]
Coloring Tools: Chocolate Chip Classic Stampin’ Pad (100908)
Tools: Paper Cutter (104152); 2-step Owl Punch (118074); 1-1/4 Circle Punch (119861); 1-3/4 Circle Punch (119850)
Accessories, Etc.: SNAIL Adhesive (104332), Stampin’ Dimensionals (104430); Multipurpose Liquid Glue (110755)
Instructions:
1. Adhere the Play Date DSP to the Real Red CS using SNAIL adhesive.
2. Punch the Owl punch, using the Chocolate Chip, Whisper White, So Saffron, & Real Red scraps, and assemble as shown in the photo. Use the Multipurpose Glue for best results. Adhere the assembled owl to your page using dimensionals.
3. Stamp the letters of your choice on Whisper White CS and punch out using the 1-1/4” Circle punch. Punch Chocolate Chip CS circles with the 1-3/4” circle punch and adhere behind your stamped circles using SNAIL. Place your letters on your page using dimensionals.
4. Adhere your Whisper White CS photo mats to your Tempting Turquoise and So Saffron mats using SNAIL, then adhere them to your page using either SNAIL or dimensionals.
5. Finally, place the photos of your choice on the page, and you are finished!
I hope you enjoyed this Guest Blogger project!
Happy Crafting!
~Elisa


